How To Draw Water Ripples
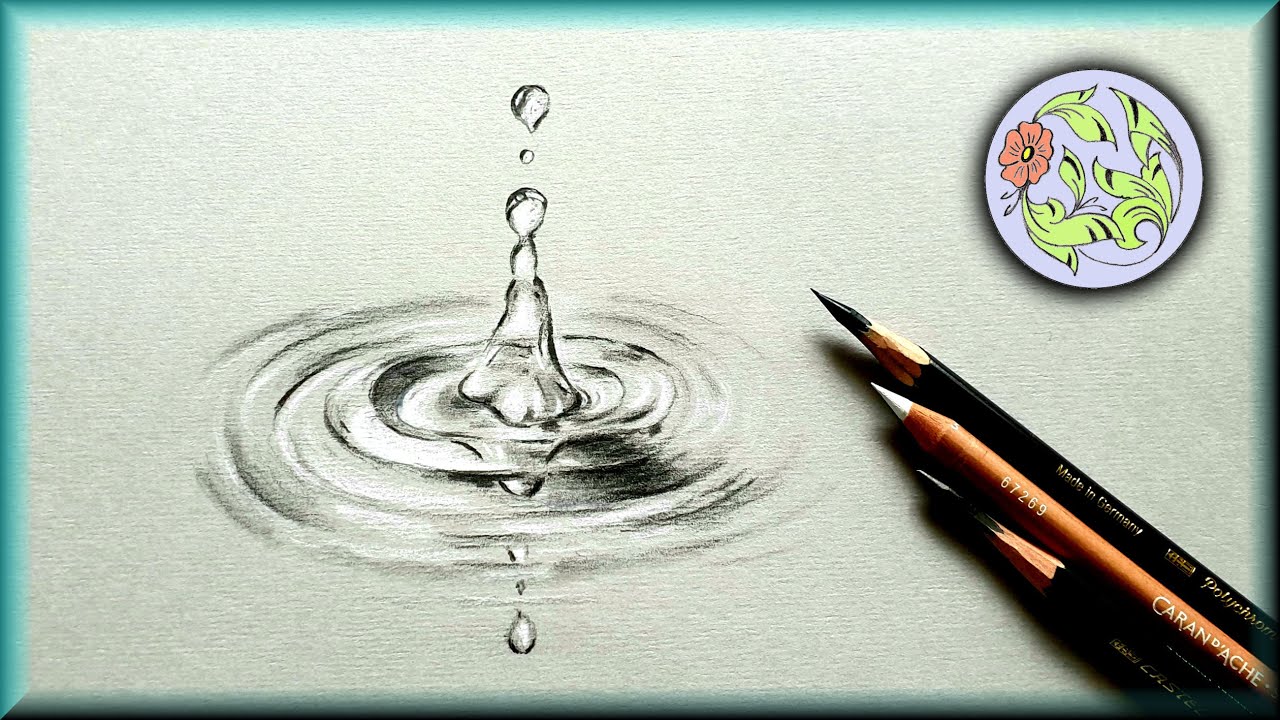
How To Draw Water Ripples - In the left beside the clouds draw the sun and paint it as well. The following rings widen as they move outwards, mimic this in your sketch. Start by lightly sketching the basic shape of the water surface where you want to create the ripples. Web we know it is water, we know it is fluid, transparent and reflective. Regardless of the type of water you’re drawing, you’ll find brushes and other tools to. Web onto the actual ripple. Web it is an exercise in adaptability. I drew a slim reflection along the waterline. Starting from the center, sketch your first oval or circle. This step is to analyze what we are seeing in the image. Now shape the clouds at the top of the water. Web first of all take a piece of paper and other pencil, sketch relevant stuff. Web creating texture is key to bringing your water ripples to life. Create a new layer on top of the layer of the flipped person. Web drawing edge of water: Starting from the center, sketch your first oval or circle. Use light, loose strokes to indicate the direction and flow of the water. In the middle of this draw the waves of the water. This approach can be used to draw any edge. Pick the concentric circles and set the aspect ratio so that it is wider than high. Web hello friends in this drawing video you will see how to draw water ripples step by step. Web it is an exercise in adaptability. I sketched a clump of trees in a landscape and drew an imaginary waterline. Start by lightly sketching the basic shape of the water surface where you want to create the ripples. The closer the. This approach can be used to draw any edge. By sketching fine lines or strokes along the outer edges of your ripple, you can mimic these subtle textures. The closer the shadow shapes are to the white areas, the more shallow the water will look. To increase depth of edge, increase length of vertical lines. Web the only wayto get. The following rings widen as they move outwards, mimic this in your sketch. Web we know it is water, we know it is fluid, transparent and reflective. Experiment with different pencil pressure and strokes to achieve the desired effect. The first thing i had to do was indicate a riverbank. For a lake or sea scene, the sky is usually. We know the swan is swimming in the water, and we know we are seeing the swan's reflections in the water. Then use the move layer tool to move this layer down a bit. The flatter the view angle, the higher the difference. Regardless of the type of water you’re drawing, you’ll find brushes and other tools to. The third. This step is to analyze what we are seeing in the image. Observe how the edges of real ripples are formed by tiny ridges and crests. Usually edge of water, like a river bank, needs to be drawn when the drawing has water in foreground. The closer the shadow shapes are to the white areas, the more shallow the water. The following rings widen as they move outwards, mimic this in your sketch. Because of that, it’s well worth the study and practice. Usually edge of water, like a river bank, needs to be drawn when the drawing has water in foreground. In this case, use vertical lines to define the edge of water as shown below. Pick the concentric. To increase depth of edge, increase length of vertical lines. It’s important to establish the overall shape and position of the ripples before adding any details. Web select black as your active color and use the fill tool or the bucket icon in the menu above your canvas area to turn the white of this copy layer to black. By. To increase depth of edge, increase length of vertical lines. To draw water is to draw light and motion itself and to be comfortable drawing something that is all about form. Overlap an oval from the center and erase it in places to make it look like a ripple. The closer the shadow shapes are to the white areas, the. Then use the move layer tool to move this layer down a bit. By adding water stroke and. To increase depth of edge, increase length of vertical lines. You can fill the cloud shapes by the cotton to make it look realistic. In this case, i am using charcoal. Web i just want to share my talent in sketching to inspire others to boost up their creativity in arts. If you can draw water, you can draw anything. The flatter the view angle, the higher the difference. Web first of all take a piece of paper and other pencil, sketch relevant stuff. We know the swan is swimming in. Web hello friends in this drawing video you will see how to draw water ripples step by step. Observe how the edges of real ripples are formed by tiny ridges and crests. Usually edge of water, like a river bank, needs to be drawn when the drawing has water in foreground. Ensure that the ripples become weaker as they move further from the center. In the left beside the clouds draw the sun and paint it as well. In this case, use vertical lines to define the edge of water as shown below. Web water ripples are still just circles, and we can use that fact to make things easier for us! Web the only wayto get the books is to join the secret launch club mailing list by sending add me, lorenzo! to [email protected]. Start by lightly sketching the basic shape of the water surface where you want to create the ripples. Now shape the clouds at the top of the water. Because of that, it’s well worth the study and practice. Web drawing edge of water: To increase depth of edge, increase length of vertical lines. Regardless of the type of water you’re drawing, you’ll find brushes and other tools to. Starting from the center, sketch your first oval or circle. The flatter the view angle, the higher the difference.
Pin on Art

Water ripple Pencil Study Water art, Water drawing, Drawings

In this tutorial, you will master a very clever technique of drawing
How To Draw Ripples In The Water

How To Draw Water Ripples

Water Ripple Line Drawing
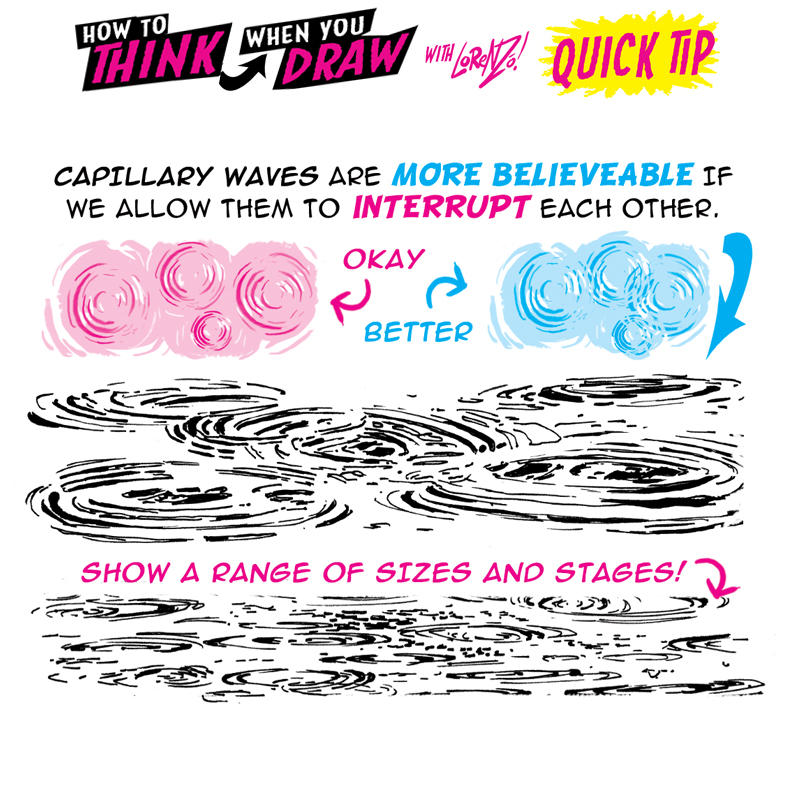
How to THINK when you draw WATER RIPPLES QUICK TIP by

10+ How To Draw A Water Ripples New Hutomo

How To Draw Water Ripples Drawing.rjuuc.edu.np

How to draw Water by Sessp on DeviantArt Concept art tutorial
We Know The Swan Is Swimming In The Water, And We Know We Are Seeing The Swan's Reflections In The Water.
Then Use The Move Layer Tool To Move This Layer Down A Bit.
By Sketching Fine Lines Or Strokes Along The Outer Edges Of Your Ripple, You Can Mimic These Subtle Textures.
Overlap An Oval From The Center And Erase It In Places To Make It Look Like A Ripple.
Related Post: